# Getting started
## Preparation
* Make sure your target Arduino is not used already
* Disable any devices in simhub which may already use it
* Recommended : Disable the arduino feature (note : as long as the firmware builder is open arduino scan will be suspended)
* Open the firmware builder
* To open the firmware builder, go in the add new device dialog and click on Create standard device firmware

## Configure your firmware
### **Automatic detection**

Points of attention :
* Device type
* Must be set to the kind of device you want.
* Unspecified will require it to be configured manually inside simhub, you should not need it anymore.
* Device name and brand name
* **Don't abuse of upper case** ! This is visually heavy and takes lot of visual user space
* The name is compiled inside the firmware and the USB signature, set it with care it's not possible to change it later without creating a new firmware
* Picture URL :
* Make sure to host your picture on a reliable host. A Github repo should be a good reliable option if you don't have other solutions.
* For the best result make sure it's a png **properly cropped** with **transparent background**.
* Pay attention to get a **proper contrast**, Simhub main theme is dark : a dark picture over a dark background won't render properly.
* When automatic detection is enabled the USB name will get a prefix added (`SHd,`) which will be used to safely recognize and scan those devices without interfering with any other serial based hardware on your system). This requirement can't be bypassed to keep automatic detection.
### **USB Definition**

**PID/VID : What is this thing ?** It's an unique identifier tied to a device model the OS (windows etc...) uses to recognize the brand and model of an usb device and eventually load the tied drivers. Simhub uses the same method to recognize a supported device.\
\
If you are building your own personal single device you can use a randomly generated PID/VID, otherwise make sure to have one per device model.
Buying a whole VID is outrageously expensive and primarily allow you to show legally the USB compliant logo on your device.
You can buy a an affordable and guaranteed to be unique PID/VID couple at MCS :
Points of attention :
* Don't forget that simple rule : **One PID/VID couple = one "product/model"**
* While simhub will successfully recognize a new device based on the USB name even if the same PID/VID couple is used. This will lead to conflicts (usb name conflicts) and impossibility to do a native integration later. In a few words : *Don't ignore the previous* **One PID/VID couple = one "product/model"***rule !*
* *How really Important is this PID/VID, if it can be set to a random value ?* Simhub will recognize compatible devices [based on their usb name](#automatic-detection), one PID/VID couple can only have one name saved in windows.
### **Upload protection**

**Protect your users from bad manipulations**, once your device is ready using the upload protection will help to protect against unwanted firmware wipes. While this "lock" is not meant to be bullet proof, it seriously reduces the chances of unwanted flashes.
### **Led strips setup**

Points of attention :
* **Take care of the maximum power draw**, you can lock the maximum brightness either for eye comfort or power.
* **Warning** : a too low maximum brightness will also reduce the color depth and accuracy
### **LEDs Roles**

* All the leds can be grouped and or splitted either as telemetry leds or buttons (including static lighting feature default color)
* The individual leds section will be enabled automatically in case of grouped leds.
* The individual leds section always follows the hardware natural ordering, make sure to make it user friendly as much as possible.
### **8x8 WS2812B RGB Matrix**

Points of attention :
* Like leds, **take care of the maximum power draw**, you can lock the maximum brightness either for eye comfort or power. **Warning** : a too low brightness will also reduce the color depth and accuracy
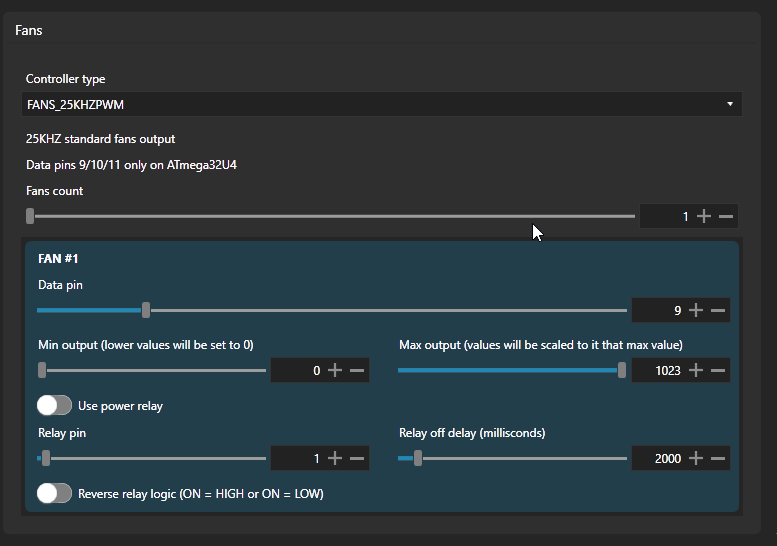
## Standard fans setup
* On an ATMEGA32U4 you can only use the pins 9/10 and 11 to get a proper 25KHZ PWM signal
* You can configure an optional relay to stop the fans from running when they are not capable of stopping
* If you want to use custom logic or want custom code you can export the firmware and customize `FansCustom.h`
## Compiling or exporting
No matter the options you retain, **always triple check that the serial port used to flash is the one of your target device** (unplug everything else). If you wipe the firmware of the wrong device, this can't be reverted !
### Built in compilation and flash
If you don't plan any further customizations, you can click on `build and flash`. the configuration will be saved for later customizations if needed. Then you will be prompted to upload
### Built in compilation and export
If you want to customize the firmware, click on `build and export`.\
\
To guarantee the initial firmware "consistency" a compilation will occur, then the firmware source will be exported as zip including all the required dependencies. See [the next chapter](https://manual.simhubdash.com/standard-serial-firmware-builder/manual-compilation-and-customization) about how to compile the firmware yourself including the required USB signature configuration.
## Adding the device inside simhub
* In the device section click on add device, the device will be recognized automatically